| All You Ever Wanted to Know About Digital UV and IR Photography, But Could Not Afford to Ask | |
| All You Ever Wanted to Know About Digital UV and IR Photography, But Could Not Afford to Ask | |
2. Can a digital camera capture IR images, just like a film-based system?
The sensitivity of digital cameras to near-infrared (NIR) is widely recognised. A great deal of people have independently discovered that their cameras record IR images, and because IR radiation is a high fraction of the Solar energy, capturing digital IR images is quite easy. An example is given below,
|
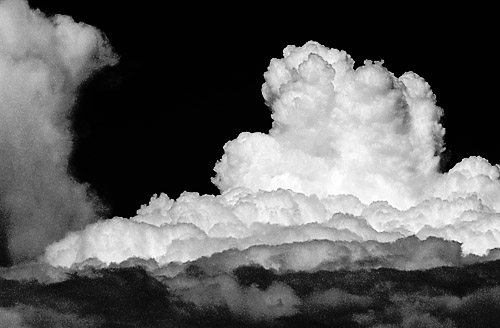
| "Approaching Storm" -
Digital black-and-white IR Nikon D1H, Micro-Nikkor 200 mm f/4 AF, Wratten 89B |
Film-originated tradition has
it IR images should be black-and-white, featuring stark "infrareddish" contrasts
with jet black skies and billowing white clouds, dark conifer
trees, and grassland and decidous trees glowing in strange
brightness. This kind of rendition is sometimes designated
"Wood's effect". The image below demonstrates clearly
that digital IR also has plenty of the ethereal atmosphere so
closely associated with traditional, film-based IR imagery.
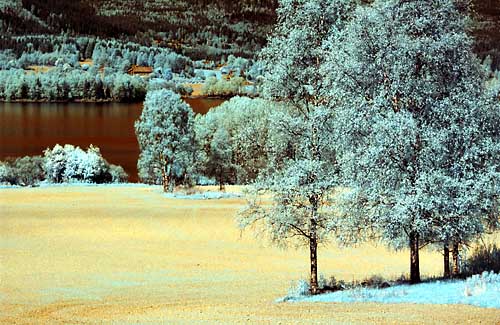
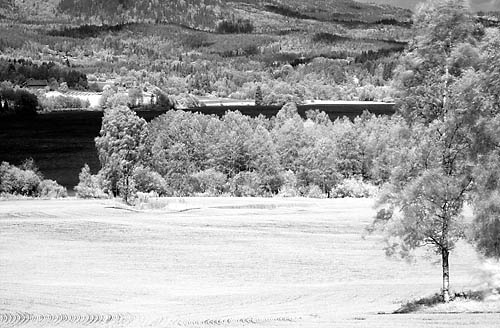 |
| Digital
IR images captured in b/w are virtually identical to
their film-based counterparts. There is tremendous depth
to the images because IR eliminates much of the haze
which normally softens distant scenes. Water and sky are
rendered very dark, while grassland and deciduous trees
are depicted in bright tones. Conifers are darkish and
stand out in the crowd, unless you shoot a coniferous
landscape in which all trees are similar and no tree dare
to differ from the others. Compare this shot to the UV equivalent. Nikon D1, UV-Nikkor 105 mm f/4.5 @200 ISO, Wratten 87, b/w TIF Photo © Bjørn Rørslett/NN |
 |
| With
digital cameras, you can add IR "colours" at
will. The photo interpretation is quite similar to the
b/w rendition, but the (false) colours add an additional
dimension to the image. When the digital image is
colour-balanced by click-white operation, you often get
the result shown here Nikon
D1X, UV-Nikkor 105 mm f/4.5 @125 ISO, Wratten 89B filter |
Exactly how the camera will produce IR images with the associated colours, depend entirely on the camera model. The digital image lifted straight off the camera may display in strange reddish or greenish hues, but an auto-level in Photoshop or a "Click-white" operation in Bibble or Nikon Capture will set the colours on a more sensible track. Tweak the colours to your heart's liking because there is no other answer to how the colour scheme should look than your own perception and imagination. I tend to prefer a colour scheme in which water and sky are rendered as dark as possible, and the landscape goes either yellowish-blue or red. To have sufficient head-room for tweaking the image files, you should shoot only using "raw" format.
With the all-round filter Wratten 89B, many IR images by digital cameras are overly reddish in hue and usually need judicious tweaking afterwards to get "colours" more pleasing. Often, the blue channel is underexposed by several stops so a proper white-balancing simply neither is possible (nor desirable), unless you do an effort to cut down on the noise from this channel. More often then not, converting the image to b/w is the simple remedy to rectify the situation. With the much darker Wratten 87, or 87C, filters, the image takes on a very muted bluish or purple hue and the conversion into b/w runs smoothly thereafter.
Troublesome, residual noise in one or more image channels is frequently an issue, in particular if you have overexposed the IR image. You may have to extract only one the less contaminated channels for further processing. My experience is the less dense IR filters easily put you in this situation.
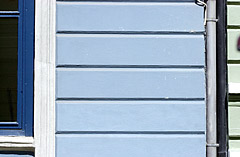
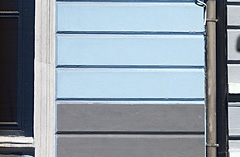
You can reveal invisible details, just as an forensic investigator This building facade has been painted twice, and digital IR can show exactly where the second coating has been applied! |
|
|
|
| Visible light | Digital IR colour |
| (L37C + Hot Mirror filters, to eliminate UV and IR) | (Wratten
89B filter) Both with Nikon D1, UV-Nikkor 105 mm f/4.5 lens |
Regarding exposure, you can in general leave that to the camera itself. There is a strong, but by all means not perfect, relationship between digital active IR and whatever exposure the camera's meter would indicate. At least, you have a good pointer as to the appropriate exposure settings. Just remember to prevent light from the eye-piece to reach the metering system, either by using an ocular shutter or by shielding the eye-piece with your hand. Use the camera's LCD to examine the histogram to ensure you have a good exposure. A point of warning here: most digital cameras pretend to display the level histogram of the image, while in reality it's just the data from the green channel which are exhibited. Do some initial test shooting to establish a correlation between the actual exposure and the LCD histogram. In fact, do NOT dial in exposure compensation for IR work unless you have done this kind of preliminary testing, or you run a risk of getting grossly over-exposed images. This would easily result if the CCD records IR predominately in its red channel, the data of which probably are not shown at all in the LCD histogram.
In comparison to visible light photography, you should expect at least 4 stops longer exposures (> +4 EV) with the less dense 89B filter, increasing to anything up to or even exceeding +10 EV with the much dark 87 and 87C filters. You may well run into exposure setting which produce quite a bit of digital noise, so seeking bright, sunny days is always the best starting point for digital IR photography, at least before you have sorted out all the potential difficulties associated with IR work. For cameras having built-in noise reduction (e.g., D100), be sure to turn that feature on.
| All You Ever Wanted to Know about Digital UV and IR Photography, But Could Not Afford to Ask |