| All You Ever Wanted to Know About Digital UV and IR Photography, But Could Not Afford to Ask | |
| All You Ever Wanted to Know About Digital UV and IR Photography, But Could Not Afford to Ask | |
4. How Digital UV and IR Differ from Film-based Systems
Infrared
(IR):
All you need to do
digital IR is a blackish IR filter to keep back visible light
(more on this later), and off you go. This is the digital
equivalent of using an IR-sensitive film. Or so it would seem.
In practice things work a little differently, because a CCD will not record NIR in only one of its colour channels (red), but more often than not also in blue or green as well. This means you will not get the typical high-contrast, grainy "IR"-look we're all familiar with from the film-based world, but more likely a muddy facsimile of the real thing. This applies to files delivered straight off the camera. In principle it doesn't matter whether you put the camera into b/w mode or not, because the colours still will "bleed" and confuse the way the CCD records IR rays impinging on it. Thus, digital and film cannot be directly compared in the manner these media record IR rays.
Clever image tweaking in Photoshop helps put the matter on a right track, or you can venture into an even more exciting "digital colour IR"-domain.
When IR colour films are used, e.g. Kodak Infrared Ektachrome type IE or EIR, the results are aptly called false-colour images. However, the colour IR film deviates from the digital IR colour by using bands in the visible range of the spectrum. Depending on filtration used, Infrared Ektachrome adds green and/or red bands to the ensuing colour image, but these are shifted upwards so green becomes blue and red is assigned green. The IR component rounds off the scene by being rendered as red. The end result of Infrared Ektachrome is bizarre, but often pleasing colours, which in no way are real. Also the image is only 1/3 IR, the rest is made up of visible light influence.
By contrast, digital IR will render colour images even after visible light is filtered out. How come? The answer is that the CCD is not film and the clever electronics in the camera which perform Bayer interpolation of the images cannot understand IR at all, so they make colours where no colours perceivable by humans could exist. Since we are free to choose any colour "interpretation" we like for an IR image, this unexpected electronic assistance is just fine. Regard it as a digital-format bonus. After all, our IR quest is for unreality and virtual dimensionality, isn't it?
|
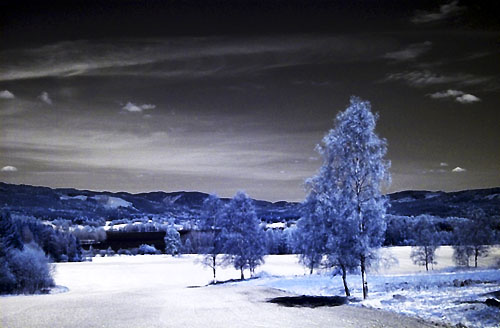
| Digital
IR landscapes have those bizarre colours and that
tremendous feeling of depth so typical for IR
photography. If you feel trees should be warm red instead
of the coolish blue portrayed here, a colour change is
just a few mouse-clicks away. Digital processing to the
rescue. Nikon
D1H, Nikkor 28 mm f/2 lens, Wratten 89B, 800 ISO |
Be aware that lens flare is a potentially disasterous issue with digital IR, much more so than for film-based systems, so keep the front lens (and filter) appropriately clean and well shaded. The lens coating may not be very efficient in near-IR, so you do tend to get significantly more flare and ghosting when shooting IR.
Another issue, often quite puzzling to the uninformed photographer, is the possible occurence of a central hot-spot in the image. This may occur at small apertures or with a zoom set to its widest settings, and results from a combination of light bouncing back and forth between the rear element(s) and the imager chip inside the camera. Such hot-spots can be lens or camera-specific, in the latter case I suspect the light baffling in the reflex mirror chamber isn't up to its task, or that the chip has a specular reflection. The AF 50 mm f/1.8 Nikkor often shows this problem, whilst older manual-focusing models do not. Another example is the AFS 12-24 mm f/4 DX Nikkor with a 89B filter on it. This setup provides a quite nasty hot-spot set to anything wider than 18 mm on the Fuji S2 Pro camera. The D70 is more troubled with hot-spots than are my D1-series cameras, and so on. The practical test must be done with the combination you want to use, and it either shows no problem, or there is that irritating hot-spot to indicate you have to combine your gear differently. Simple as that, really.
Ultra-violet
(UV):
Test images show
clearly that digital cameras not only are able to record UV, but
convey essentially the same scientific information as any
film-based system. However, the colours are different from shots
on film. Instead of the mainly bluish hues of UV film pictures,
we usually get a colour scheme in which reddish colours prevail.
There are important reasons for this discrepancy. So, precisely,
what sets the digital camera apart when it comes to recording
invisible radiation? Three contingencies give issues.
Firstly, the CCD records not only ultra-violet (UV) rays like an
ordinary film, but picks up a lot of near-infrared as well. In
fact, the IR sensitivity of the CCD typically is so high an
anti-IR filter is positioned in front of the sensor surface. This
elevated sensitivity to IR, combined with UV and visible light
response of the CCD, means the digital camera behaves like it
were loaded with IR film all the time. When we shoot traditional
film stock, we are pretty much ascertained that the only spectral
culprit is UV, and that we can curb that issue simply by putting
a UV-filter on the lens. Not so with a digital camera.
Secondly, the blackish opaque filters needed to block visible
light and pass UV have a secondary transmittance window which
opens - you guessed it - straight into the near-IR. Because the
near-IR band is a bigger fraction of the incident sunlight than
UV itself, there thus is a very real danger of IR contamination when digital UV photography is attempted.
In fact, often when people assert they have obtained
"UV" images with digital cameras, mainly IR is recorded
with some additional deep purple. My Nikon Coolpix 950 behaves
this way.
And thirdly, the Bayer filter, which enables the CCD to read
different colours at each pixel location thus providing the
camera with a single-shot feasibility, has not been designed for
handling the non-visible spectral components and largely breaks
down when it comes to how UV and IR irradiation is recorded.
Thus, one would expect UV to register in blue hues similar to those exhibited by UV shots on
film, but this is frequently not the observed situation. In fact,
UV commonly triggers the red-sensitive pixels, not just the blue
ones. Even green pixels may record the UV rays impinging onto the
CCD surface. To exacerbate the situation even further, IR mostly
is recorded as reddish hues. So, not only do the digital cameras
register UV and IR simultaneously, these widely separated bands
of the spectrum may affect the very same pixels on the CCD. The
dyes used in the Bayer filter in front of the CCD may not respond
as expected outside the visible band, in fact such dyes may be
almost transpart e.g. to IR. And finally, the software needed for
decoding the CCD record into an image may react in strange ways
to the non-normal data captured by the CCD, so a variety of
bizarre colours may result.
|
|
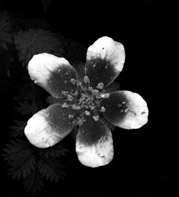
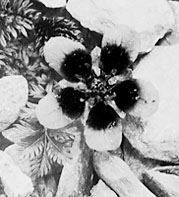
| Nikon D1H, green channel shows high UV reflectance of flowers, background very dark | Nikon D100, blue channel, strong UV signature on flower petals, high reflectance of background probably due to contamination from other colours and IR |
These images of a flower of Potentilla anserina were taken minutes apart with my UV-Nikkor 105 mm f/4.5 lens and the Nikon FF + CC 20C filter pack. Although the final interpretation of the floral marks is identical between these images, the UV image is formed by different means on the CCD. The completed UV images are hence quite varied in their colour rendition. |
|
There are additional issues concerning UV-generated
fluorescence and IR-bioluminescence, the importance of
which for recording invisible light is not full understood.
However, as fluorescence phenomena occur at low light levels they
are not likely impacting the digital image, unless you set up
your shooting to target such motifs. UV fluorescence can be
digitally captured following identical guidelines as apply to
film-based images. You need a UV exciting source (blacklight, or
UV flash), a subject capable of fluorescence (mineral samples,
print paper, white clothes etc. all may show this, or why not try
out bank notes or fluorescent paint), and a UV cut-off filter
over the lens. Do the shooting in a darkened room so as not to
let extraneous visible light spoil the picture. It is thinkable
that the dyes in the Bayer filter in front of the CCD themselves
may fluoresce when hit by UV rays, but I haven't followed up this
theoretical possibility.
***
All the potential of
having a digital camera capable of recording UV and/or IR would
be lost if it couldn't produce images with visual impact and
interesting detail. Hence we should concern ourselves with the
output, not the input, of these digital machines. Clearly, the
UV/IR photographer needs some factual insight into the invisible
light shaping his images of invisibility, but this is no big deal
when you have the instant feedback of a digital camera. It is
literally point and shoot, then assess the ensuing images, and
retake the shots if necessary.
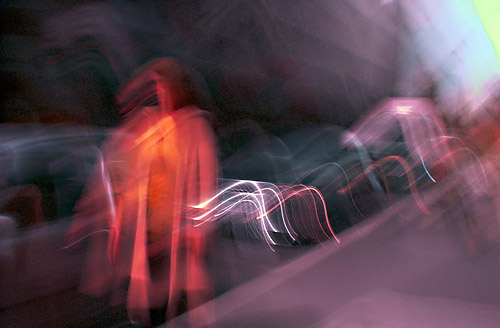 |
| Digital UV
images can be as enigmatic as you prefer. No holds barred
here. Nikon D1H, 28 mm f/2.8 Nikon
Series E lens, FF + CC 20 C filter pack |
| All You Ever Wanted to Know about Digital UV and IR Photography, But Could Not Afford to Ask |