Creating
"False-Colour" Infrared Images Using Nikon D1
By
Bjørn Rørslett
A.
False-Colour
Infrared
B.
|
|
Click any
thumbnail to get a bigger picture. It will open in a
smaller window. All images: © Bjørn Rørslett/NN
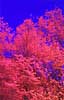
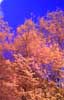
Taken in May, 2000
using 35 mm f/2.8 PC-Nikkor lens on a D1, with stacked
polarizers (see text)
A: Maximal
polarization
B: Intermediate
polarization
|
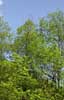
Visible Light. No polarizers
|
|
Sometimes you are in for really big
surprises. I've experimented with stacking polarizers several
times before, and obtained some strange effects with film-based
systems. However, when I tried this trick with my D1, I
unexpectedly got images that closely resemble those of
false-colour infrared film. The pale spring sky turned into a
deep blue, and the fresh foliage became vibrantly red. Since I
obtained the first shots, shown above, I have verified that this
is indeed an infrared image. If I add a Tiffen hot-mirror filter
(which blocks IR) to the stack of polarizers, the colour
rendition of the digital image turns into the ordinary again.
However, besides involving IR, the "false-colour"
images have an additional UV component. This is readily apparent
when using the UV-Nikkor 105 mm f/4.5 to record
"false-colour" images: I tested this using dandelions,
which have a distinct UV patterns in their flowers, and sure
enough, this familiar pattern emerged. When the usual
Micro-Nikkor 105 mm f/4 was substituted for the UV-Nikkor, the UV
floral pattern disappeared. I'm going to publish such pictures
when I'm entirely familiar with this novel technique.
I knew in advance that Nikon D1 could
capture UV as well as IR radiation, and
already had the images to prove this. However, why I got the
stunning "false-colour" IR effect is quite unclear to
me. That doesn't matter much because it's obvious that
interesting pictures can be obtained. So be it.
Then, how is this effect obtained, besides
just using a D1. Really it is simplicity itself. You just need to
stack two polarizers
atop each other. At least one of these
should be the linear type, preferably both. Also, experiments
show that combining high- and low-quality filters give the best
results. For my usual setup, I attach a B+W 60 mm thread filter
onto an old Nikon 52 mm polarizer (this filter has outer thread
size of 60 mm so mates happily with the B+W). In the beginning,
with F5 and Arca-Swiss cameras, I used a Hakuba filter instead of
the Nikon to get even more stunning results. Unfortunately, for
some non-explicable reason I gave my poorly-performing Hakuba
filter away before it could be tried in the digital era. When the
filters are rotated independently, you'll notice strong
attenuation of light and sectors of irregular colours will
appear. Adjust the polarizers for a maximum effect and take the
picture. Be aware that using a linear polarizer will throw off
the meter on D1, so some experimentation is called for. Because
exposures can be checked using the LCD display on D1, this is in
fact quite easy. Make sure you also try different degrees of
polarization, as this will impact the colour rendition by a
significant degree.
Please note that due to the thickness of
the filter stack, focal lengths shorter than 35 mm will show
vignetting of the image even on the D1.
For more information on the Nikon D1 camera and its performance under field condtions,
my review pages for it should be consulted.
| |
Last Update
1 October, 2002
|
|
)
)
)